
Basics: An example workflow
A Snakemake workflow is defined by specifying rules in a Snakefile. Rules decompose the workflow into small steps (for example, the application of a single tool) by specifying how to create sets of output files from sets of input files. Snakemake automatically determines the dependencies between the rules by matching file names.
The Snakemake language extends the Python language, adding syntactic structures for rule definition and additional controls. All added syntactic structures begin with a keyword followed by a code block that is either in the same line or indented and consisting of multiple lines. The resulting syntax resembles that of original Python constructs.
In the following, we will introduce the Snakemake syntax by creating an example workflow. The workflow comes from the domain of genome analysis. It maps sequencing reads to a reference genome and calls variants on the mapped reads. The tutorial does not require you to know what this is about. Nevertheless, we provide some background in the following section.
Background
The genome of a living organism encodes its hereditary information. It serves as a blueprint for proteins, which form living cells, carry information and drive chemical reactions. Differences between species, populations or individuals can be reflected by differences in the genome. Certain genomic differences can cause syndromes or predisposition for certain diseases, or cause cancerous growth in the case of tumour cells that have accumulated changes with respect to healthy cells. This makes the genome a major target of biological and medical research.
Nowadays, the genome can be analyzed through DNA sequencing, producing gigabytes of data from a single biological sample (e.g. a biopsy of some tissue). For technical reasons, DNA sequencing cuts the DNA of a sample into millions of smaller pieces, measured as so-called reads. In order to recover the genome of the sample, one has to map these reads against a known reference genome (e.g. the human one, obtained during the famous human genome project). This task is called read mapping.
Often, it is of interest where an individual genome is different from the species-wide consensus represented by the reference genome. Such differences are called variants. They are responsible for harmless individual properties (like eye color), but can also cause diseases like cancer. By investigating the differences between the mapped reads and the reference sequence at a particular genome position, variants can be detected. This is a statistical challenge, as these variants have to be distinguished from artifacts generated by the sequencing process.
Step 1: The first rule
Attention
Please make sure that you are in the correct working directory and have activated your environment, as described in the Setup Section.
In Snakemake, workflows are defined by specifying rules in a Snakefile.
A rule is the most basic execution unit within a workflow.
The first step of our task is to map reads of a given sample to a given reference genome (see Background).
For this, we can use the tool bwa, specifically the subcommand bwa mem, to write our very first rule.
In the working directory, create a new file called Snakefile with an editor of your choice.
We propose to use an integrated development environment (IDE) such as Visual Studio Code, which provides a syntax highlighting Snakemake extension and a remote extension for directly using the IDE on a remote server.
In the Snakefile, define the following rule:
rule bwa_map:
    input:
        "data/genome.fa",
        "data/samples/A.fastq"
    output:
        "mapped_reads/A.bam"
    shell:
        "bwa mem {input} | samtools view -Sb - > {output}"
Rules have a name (bwa_map) and a number of directives, like input, output and shell.
The input and output directives are followed by lists of files that are expected to be used or created by the rule.
The shell directive is followed by a string containing the shell command to execute.
The shell command invokes bwa mem with reference genome and reads, and pipes the output into samtools, which creates a compressed BAM file containing the alignments.
As you can see, we can refer to elements of the rule within the shell command string by putting them in curly braces ({}).
Here, we refer to the output file by specifying {output} and to the input files by specifying {input}.
Since the rule has multiple input files, Snakemake will concatenate them, separated by a whitespace.
In other words, Snakemake will replace {input} with data/genome.fa data/samples/A.fastq before executing the command.
When executing a workflow, Snakemake tries to generate given target files. Target files can be specified via the command line:
$ snakemake -np mapped_reads/A.bam
in the working directory containing the Snakefile, we tell Snakemake to generate the target file mapped_reads/A.bam.
Since we have used the -n (or --dry-run) flag here, Snakemake will only show the execution plan instead of actually performing the steps.
The -p flag instructs Snakemake to also print the resulting shell command for illustration.
To generate the target files, Snakemake applies the rules given in the Snakefile in a top-down way. The application of a rule to generate a set of output files is called job. For each input file of a job, Snakemake again (i.e. recursively) determines rules that can be applied to generate it. This yields a directed acyclic graph (DAG) of jobs where the edges represent dependencies. So far, we only have a single rule, and the DAG of jobs consists of a single node. Nevertheless, we can execute our workflow with
$ snakemake --cores 1 mapped_reads/A.bam
Whenever you execute a workflow, you need to specify the number of cores to use. For this tutorial, we will use a single core for now. Later, you will see how parallelization works.
Note that, if you try to run that command a second time, Snakemake will not try to create mapped_reads/A.bam again.
That is because the output is already present and Snakemake can determine that it is still consistent with the input files and the rule definition.
If an input file changes, an output file is missing, or relevant parts of the workflow definition change, Snakemake will schedule the affected jobs again.
Tip
It is best practice to have subsequent steps of a workflow in separate, unique, output folders. This keeps the working directory structured. Further, the directory prefixes allow Snakemake to quickly discard rules when searching for rules that produce the requested input. This accelerates the resolution of rule dependencies in a workflow.
Step 2: Generalizing rules
Obviously, this rule will only work for a single sample with reads in the file data/samples/A.fastq.
However, Snakemake allows generalizing rules through the use of named wildcards.
In your Snakefile, replace the A in the second input file and in the output file with the wildcard {sample}, leading to
rule bwa_map:
    input:
        "data/genome.fa",
        "data/samples/{sample}.fastq"
    output:
        "mapped_reads/{sample}.bam"
    shell:
        "bwa mem {input} | samtools view -Sb - > {output}"
Note
You can have multiple wildcards in your output and input file paths. However, to avoid conflicts with other jobs of the same rule, all output files of a rule have to contain exactly the same wildcards.
When Snakemake determines that this rule can be applied to generate a target file, it will propagate that value to all occurrences of the {sample} wildcard in that rule, thereby determining the necessary input files for the resulting job.
When executing
$ snakemake -np mapped_reads/B.bam
Snakemake will determine that the rule bwa_map can be applied to generate the target file by replacing the wildcard {sample} with the value B.
In the output of the dry-run, you will see how the wildcard value is propagated to the input files and all filenames in the shell command.
You can also specify multiple targets, for example:
$ snakemake -np mapped_reads/A.bam mapped_reads/B.bam
Adding in some Bash magic can make this particularly handy. For example, you can also write our multiple targets as
$ snakemake -np mapped_reads/{A,B}.bam
This is not special Snakemake syntax.
Bash is just applying its brace expansion to the set {A,B}, creating the given path for each element and separating the resulting paths by a whitespace.
In both cases, you will see that Snakemake only proposes to create the output file mapped_reads/B.bam.
This is because you already executed the workflow for mapped_reads/A.bam before, and the corresponding output is still up to date.
Step 3: Adding a second rule that depends on the first
For later steps, we need the read alignments in the BAM files to be sorted.
This can be achieved with the samtools sort command.
For this, we add another rule to our Snakefile beneath the bwa_map rule:
rule samtools_sort:
    input:
        "mapped_reads/{sample}.bam"
    output:
        "sorted_reads/{sample}.bam"
    shell:
        "samtools sort -T sorted_reads/{wildcards.sample} "
        "-O bam {input} > {output}"
Tip
In the shell command above, we split the string into two lines, which are automatically concatenated into one by Python. This is a handy pattern to avoid long shell command lines. When using this, make sure to have a trailing whitespace in each line but the last, to keep arguments properly separated.
This rule will take the input file from the mapped_reads directory and store a sorted version in the sorted_reads directory.
Note that Snakemake automatically creates missing directories before jobs are executed.
For this shell command, we need the value of the wildcard sample.
Snakemake allows us to access wildcards in the shell command via the wildcards object, which, for each wildcard, has a corresponding attribute that provides its value.
When issuing
$ snakemake -np sorted_reads/B.bam
you will see how Snakemake wants to run first the rule bwa_map and then the rule samtools_sort to create the desired target file:
Snakemake automatically determines dependencies between rules by matching file names.
Step 4: Examining the DAG of jobs
Tip
Snakemake uses the Python format mini language to format shell commands.
Sometimes you have to use braces ({}) for something else in a shell command.
In that case, you have to escape them by doubling, for example when relying on the bash brace expansion we mentioned above: ls {{A,B}}.txt.
Next, we first need to use samtools again to index the sorted read alignments so that we can quickly access reads by the genomic location they were mapped to. This can be done with the following rule:
rule samtools_index:
    input:
        "sorted_reads/{sample}.bam"
    output:
        "sorted_reads/{sample}.bam.bai"
    shell:
        "samtools index {input}"
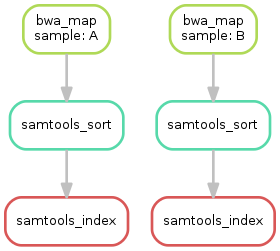
Having three steps already, it is a good time to take a closer look at the resulting directed acyclic graph (DAG) of jobs. By executing
$ snakemake sorted_reads/{A,B}.bam.bai --dag | dot -Tsvg > dag.svg
we create a visualization of the DAG using the dot command provided by Graphviz.
For the given target files, Snakemake specifies the DAG in the dot language and pipes it into the dot command, which renders the definition into SVG format.
The rendered DAG is piped into the file dag.svg and will look similar to this:
Note
If you went with: Run tutorial for free in the cloud via Gitpod, you can easily view the resulting dag.svg by right-clicking on the file in the explorer panel on the left and selecting Open With -> Preview.
The DAG contains a node for each job with the edges connecting them representing the dependencies. The frames of jobs that don’t need to be run (because their output is up-to-date) are dashed. For rules with wildcards, the value of the wildcard for the particular job is displayed in the job node.
Exercise
Run parts of the workflow using different targets. Recreate the DAG and see how different rules’ frames become dashed because their output is present and up-to-date.
Step 5: Aggregating Inputs
In the next step of our workflow, we would like to aggregate the mapped reads from all samples, and jointly call genomic variants on them (see Background). For this, we will combine the two utilities samtools and bcftools. Snakemake provides a helper function for collecting input files that helps us to describe the aggregation in this step. In the following, we first conceptually describe how to use the function. Do not immediately put the following examples into your Snakefile. Using
expand("sorted_reads/{sample}.bam", sample=SAMPLES)
we obtain a list of files where the given pattern "sorted_reads/{sample}.bam" was formatted with the values in a given list of samples SAMPLES, i.e.
["sorted_reads/A.bam", "sorted_reads/B.bam"]
This is particularly useful when the pattern contains multiple wildcards. For example,
expand("sorted_reads/{sample}.{replicate}.bam", sample=SAMPLES, replicate=[0, 1])
would create the product of all elements of SAMPLES and the list [0, 1], yielding
["sorted_reads/A.0.bam", "sorted_reads/A.1.bam", "sorted_reads/B.0.bam", "sorted_reads/B.1.bam"]
Now that you know how expand works, we can now use it to perform our aggregation, i.e. the following code goes into the Snakefile again.
We first let Snakemake know which samples we want to consider.
Remember: Snakemake works backwards from requested output, not from available input.
Thus, it does not automatically infer all possible output just because you placed new fastq files in the data folder.
Also remember that Snakefiles are, in principle, Python code enhanced by some declarative statements to define workflows.
Hence, we can define the list of samples ad-hoc in plain Python at the top of the Snakefile:
SAMPLES = ["A", "B"]
Later, we will learn about more sophisticated ways to do this, like config files, but for now, this is enough. Add the following rule to our Snakefile:
rule bcftools_call:
    input:
        fa="data/genome.fa",
        bam=expand("sorted_reads/{sample}.bam", sample=SAMPLES),
        bai=expand("sorted_reads/{sample}.bam.bai", sample=SAMPLES)
    output:
        "calls/all.vcf"
    shell:
        "bcftools mpileup -f {input.fa} {input.bam} | "
        "bcftools call -mv - > {output}"
Here, we invoke our expand function to aggregate over the aligned reads of all samples.
With multiple input or output files, it is sometimes handy to refer to them separately in the shell command.
This can be done by specifying names for input or output files, for example with fa=....
The files can then be referred to in the shell command by name, for example with {input.fa}.
Furthermore, you will notice that the input or output file lists can contain arbitrary Python statements, as long as they return a string or a list of strings.
Note
If you name input or output files like above, their order won’t be preserved when referring to them as {input}.
Further, note that named and unnamed (i.e., positional) input and output files can be combined, but the positional ones must come first, equivalent to Python functions with keyword arguments.
Exercise
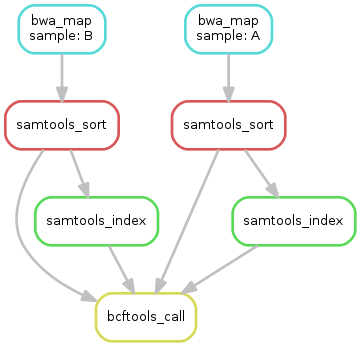
obtain the updated DAG of jobs for the target file
calls/all.vcf, it should look like this:
Step 6: Using custom scripts
Usually, a workflow does not only consist of invoking various tools, but will also contain custom code, e.g. to calculate summary statistics or create plots. While Snakemake also allows you to directly write Python code inside a rule, it is usually reasonable to move such logic into separate scripts.
For this purpose, Snakemake offers the script directive.
It is best practice to use the script directive whenever an inline code block would have more than a few lines of code.
Add the following rule to your Snakefile:
rule plot_quals:
    input:
        "calls/all.vcf"
    output:
        "plots/quals.svg"
    script:
        "scripts/plot-quals.py"
With this rule, we will eventually generate a histogram of the quality scores that have been assigned to the variant calls in the file calls/all.vcf.
The actual Python code to generate the plot is contained in scripts/plot-quals.py.
Script paths are always relative to the referring Snakefile.
In the script, all properties of the rule like input, output, wildcards, etc. are available as attributes of a global snakemake object.
Create the file scripts/plot-quals.py, with the following content:
import matplotlib
matplotlib.use("Agg")
import matplotlib.pyplot as plt
from pysam import VariantFile

quals = [record.qual for record in VariantFile(snakemake.input[0])]
plt.hist(quals)

plt.savefig(snakemake.output[0])
Although there are other strategies to invoke separate scripts from your workflow (e.g. invoking them via shell commands), the benefit of this is obvious: The script logic is separated from the workflow logic (and can even be shared between workflows), but boilerplate code like the parsing of command line arguments is unnecessary.
Note
snakemake.input and snakemake.output always contain a list of file names, even if the lists each contain only one file name.
Therefore, to refer to a particular file name, you have to index into that list.
snakemake.output[0] will give you the first element of the output file name list, something that always has to be there.
Apart from Python scripts, it is also possible to use R and various other languages.
In R scripts, an S4 object named snakemake analogous to the Python case above is available and allows access to input and output files and other parameters.
Here, the syntax follows that of S4 classes with attributes that are R lists.
For example, we can access the first input file with snakemake@input[[1]] (note that the first file does not have index 0 here, because R starts counting from 1).
Named input and output files can be accessed in the same way, by providing the name instead of an index: snakemake@input[["myfile"]].
For details and examples, see the External scripts section in the Documentation.
Step 7: Adding a target rule
So far, we always executed the workflow by specifying a target file at the command line.
Apart from filenames, Snakemake also accepts rule names as targets, as long as the requested rule does not have wildcards.
Hence, it is possible to write target rules collecting particular subsets of the desired results or all results.
Moreover, if no target is given at the command line, Snakemake will define the first rule of the Snakefile as the target.
Hence, it is best practice to have a rule all at the top of the workflow which has all of the typically desired target files as input files.
Here, this means that we add a rule
rule all:
    input:
        "plots/quals.svg"
to the top of our workflow. When executing Snakemake with
$ snakemake -n
the execution plan for creating the file plots/quals.svg, will be shown.
Note that, apart from Snakemake considering the first rule of the workflow as the default target, the order of rules in the Snakefile is arbitrary and does not influence the DAG creation.
Hint
In case you have multiple reasonable sets of target files, you can add multiple target rules at the top of the Snakefile.
While Snakemake will execute the first rule per default, you can target any of them via the command line (for example, snakemake -n mytarget).
Exercise
Create the DAG of jobs for the complete workflow.
Execute the complete workflow and have a look at the resulting
plots/quals.svg.Snakemake provides handy flags for forcing re-execution of parts of the workflow. Have a look at the command line help with
snakemake --helpand search for the flag--forcerun. Then, use this flag to re-execute the rulesamtools_sortand see what happens.Snakemake displays the reason for each job (under
reason:). Perform a dry-run that forces some rules to be reexecuted (using the--forcerunflag in combination with some rulename) to understand the decisions of Snakemake.
After having a look at the summary, please go on with the advanced part of the tutorial.
Summary
In total, the resulting workflow looks like this:
SAMPLES = ["A", "B"]


rule all:
    input:
        "plots/quals.svg"


rule bwa_map:
    input:
        "data/genome.fa",
        "data/samples/{sample}.fastq"
    output:
        "mapped_reads/{sample}.bam"
    shell:
        "bwa mem {input} | samtools view -Sb - > {output}"


rule samtools_sort:
    input:
        "mapped_reads/{sample}.bam"
    output:
        "sorted_reads/{sample}.bam"
    shell:
        "samtools sort -T sorted_reads/{wildcards.sample} "
        "-O bam {input} > {output}"


rule samtools_index:
    input:
        "sorted_reads/{sample}.bam"
    output:
        "sorted_reads/{sample}.bam.bai"
    shell:
        "samtools index {input}"


rule bcftools_call:
    input:
        fa="data/genome.fa",
        bam=expand("sorted_reads/{sample}.bam", sample=SAMPLES),
        bai=expand("sorted_reads/{sample}.bam.bai", sample=SAMPLES)
    output:
        "calls/all.vcf"
    shell:
        "bcftools mpileup -f {input.fa} {input.bam} | "
        "bcftools call -mv - > {output}"


rule plot_quals:
    input:
        "calls/all.vcf"
    output:
        "plots/quals.svg"
    script:
        "scripts/plot-quals.py"
Now, please go on with the advanced part of the tutorial.